Interfacing a PS3 controller on a Raspberry Pi using NodeJS
A basic example of how to communicate with a PS3 controller on a Raspberry Pi and have things reacting to its input. Once you got these basics the possibilities are endless!
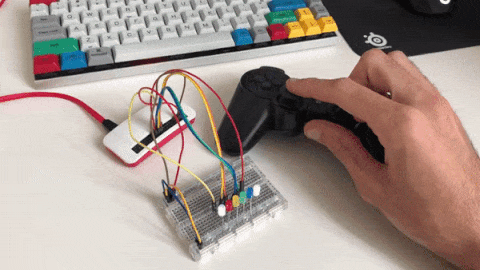
To give you a more visual example of what we'll be making, see the GIF below.

Hardware requirements
A PS3 controller
A Raspberry Pi Zero W
A breadboard
Some LEDs
Some jump wires
Prerequisites
I assume you have already installed Raspbian on your Raspberry Pi. I also assume you already have NodeJS installed on your Raspberry Pi (use a version lower than 10, I used 9.9.0). And lastly I also assume you have your PS3 controller already paired. If you haven't please follow those guides first.
Project setup
Native dependencies
Before we can get started we'll need to install the joystick lib. This will expose the PS3 controller on /dev/input/js0. Run the following commands to install joystick.
sudo apt-get update
sudo apt-get install -y joystick
Normally if you run now ls /dev/input/js* you should see /dev/input/js0 popping up in the output. Test the joystick by running jstest /dev/input/js0 and press some buttons to see if it works.
Now that is out of the way let's create the required files, we will need only 2 files, index.js which will contain our app and package.json for our dependencies. Create both files and paste the following contents in package.json.
{
  "dependencies": {}
}
Reading out the PS3 controller
Install and save the following node dependency by running npm i --save joystick. Open up index.js and import the lib and add two listeners for the button event and axis event. Log the output to the console so we can see if that's working and what's actually inside these events.
// Libs
const joystick = require('joystick');

// Init PS3 controller, 0 = /dev/input/js0
const ps3Controller = new joystick(0);

// On button press
ps3Controller.on('button', button => {
  console.log({ button });
});

// On axis movement
ps3Controller.on('axis', axis => {
  console.log({ axis });
});
Buttons
First try, let's see if we can get some output, run the code by executing npm run .. When you press some buttons you should get something like the following output.
{ button: { time: 4294954706, value: 1, number: 0, type: 'button', id: 0 } }
{ button: { time: 4294954956, value: 0, number: 0, type: 'button', id: 0 } }
{ button: { time: 4294961896, value: 1, number: 1, type: 'button', id: 0 } }
{ button: { time: 4294962076, value: 0, number: 1, type: 'button', id: 0 } }
{ button: { time: 4294963226, value: 1, number: 2, type: 'button', id: 0 } }
{ button: { time: 4294963416, value: 0, number: 2, type: 'button', id: 0 } }
{ button: { time: 4294964146, value: 1, number: 3, type: 'button', id: 0 } }
{ button: { time: 4294964386, value: 0, number: 3, type: 'button', id: 0 } }
I pressed cross, circle, triangle, square (anyone else GTA cheats throwback 😂?). It looks like we can identify the button by mapping the number prop. It also seems like we get 2 events for one button interaction; one on key down and one on key up, respectively with value 1 and value 0.
Joysticks
When you move the joysticks you should see output similar to this.
{ axis: { time: 524240, value: -2703, number: 4, type: 'axis', id: 0 } }
{ axis: { time: 524300, value: -1352, number: 3, type: 'axis', id: 0 } }
{ axis: { time: 524300, value: -11486, number: 4, type: 'axis', id: 0 } }
{ axis: { time: 524300, value: -13513, number: 4, type: 'axis', id: 0 } }
{ axis: { time: 524360, value: -5068, number: 3, type: 'axis', id: 0 } }
{ axis: { time: 524360, value: -24999, number: 4, type: 'axis', id: 0 } }
{ axis: { time: 524370, value: -28039, number: 4, type: 'axis', id: 0 } }
{ axis: { time: 524430, value: -5743, number: 3, type: 'axis', id: 0 } }
{ axis: { time: 524430, value: -32767, number: 4, type: 'axis', id: 0 } }
{ axis: { time: 524480, value: -6081, number: 3, type: 'axis', id: 0 } }
{ axis: { time: 524610, value: -5406, number: 3, type: 'axis', id: 0 } }
{ axis: { time: 524660, value: 0, number: 3, type: 'axis', id: 0 } }
{ axis: { time: 524660, value: 0, number: 4, type: 'axis', id: 0 } }
{ axis: { time: 525270, value: 6756, number: 4, type: 'axis', id: 0 } }
{ axis: { time: 525280, value: 9458, number: 4, type: 'axis', id: 0 } }
{ axis: { time: 525340, value: 19931, number: 4, type: 'axis', id: 0 } }
{ axis: { time: 525400, value: 30403, number: 4, type: 'axis', id: 0 } }
{ axis: { time: 525400, value: 32767, number: 4, type: 'axis', id: 0 } }
{ axis: { time: 525460, value: 2026, number: 3, type: 'axis', id: 0 } }
{ axis: { time: 525520, value: 3040, number: 3, type: 'axis', id: 0 } }
{ axis: { time: 525760, value: 3715, number: 3, type: 'axis', id: 0 } }
{ axis: { time: 525820, value: 7431, number: 3, type: 'axis', id: 0 } }
{ axis: { time: 525820, value: 22971, number: 4, type: 'axis', id: 0 } }
{ axis: { time: 525830, value: 5405, number: 3, type: 'axis', id: 0 } }
{ axis: { time: 525830, value: 19931, number: 4, type: 'axis', id: 0 } }
{ axis: { time: 525880, value: 0, number: 3, type: 'axis', id: 0 } }
{ axis: { time: 525880, value: 0, number: 4, type: 'axis', id: 0 } }
{ axis: { time: 526850, value: 7094, number: 3, type: 'axis', id: 0 } }
{ axis: { time: 526850, value: 9120, number: 3, type: 'axis', id: 0 } }
{ axis: { time: 526900, value: 16215, number: 3, type: 'axis', id: 0 } }
{ axis: { time: 526910, value: 18579, number: 3, type: 'axis', id: 0 } }
{ axis: { time: 526970, value: 29389, number: 3, type: 'axis', id: 0 } }
{ axis: { time: 527030, value: 32767, number: 3, type: 'axis', id: 0 } }
{ axis: { time: 527400, value: 29727, number: 3, type: 'axis', id: 0 } }
{ axis: { time: 527410, value: 21620, number: 3, type: 'axis', id: 0 } }
{ axis: { time: 527460, value: 0, number: 3, type: 'axis', id: 0 } }
{ axis: { time: 528070, value: -4392, number: 3, type: 'axis', id: 0 } }
{ axis: { time: 528130, value: -20945, number: 3, type: 'axis', id: 0 } }
{ axis: { time: 528140, value: -23985, number: 3, type: 'axis', id: 0 } }
{ axis: { time: 528190, value: -32767, number: 3, type: 'axis', id: 0 } }
{ axis: { time: 528680, value: -22972, number: 3, type: 'axis', id: 0 } }
{ axis: { time: 528740, value: -10473, number: 3, type: 'axis', id: 0 } }
{ axis: { time: 528740, value: -3379, number: 3, type: 'axis', id: 0 } }
{ axis: { time: 528800, value: 0, number: 3, type: 'axis', id: 0 } }
I did the following with the right joystick: up, down, right, left. In the default, center position, the value is always 0. The range seems to go from -32767 till 32767. And number 4 seems to be the right y-axis and number 3 the right x-axis.
Parsing the events
I wrote some logic to parse our events into useable blocks, our code looks as the following now.
// Libs
const joystick = require('joystick');

// Init PS3 controller, 0 = /dev/input/js0
const ps3Controller = new joystick(0);

// On button press (triggers when pressed and when released)
ps3Controller.on('button', button => {
  switch (button.number) {
    case 0: // cross
      console.log('cross', button.value);
      break;
    case 1: // circle
      console.log('circle', button.value);
      break;
    case 2: // triangle
      console.log('triangle', button.value);
      break;
    case 3: // square
      console.log('square', button.value);
      break;
  }
});

// On axis movement
ps3Controller.on('axis', axis => {
  switch (axis.number) {
    case 1: // left y-axis
      console.log('left y-axis', axis.value);
      break;
    case 4: // right y-axis
      console.log('right y-axis', axis.value);
      break;
  }
});
When you run the script now you will get some more readable output. Give it another try and see if everything matches with what we wrote. Something else you might have noticed by now is that it sends an event on start as well with the default state. This can be handy to immediately act upon (set some things in their default state) before we actually interact with the controller.
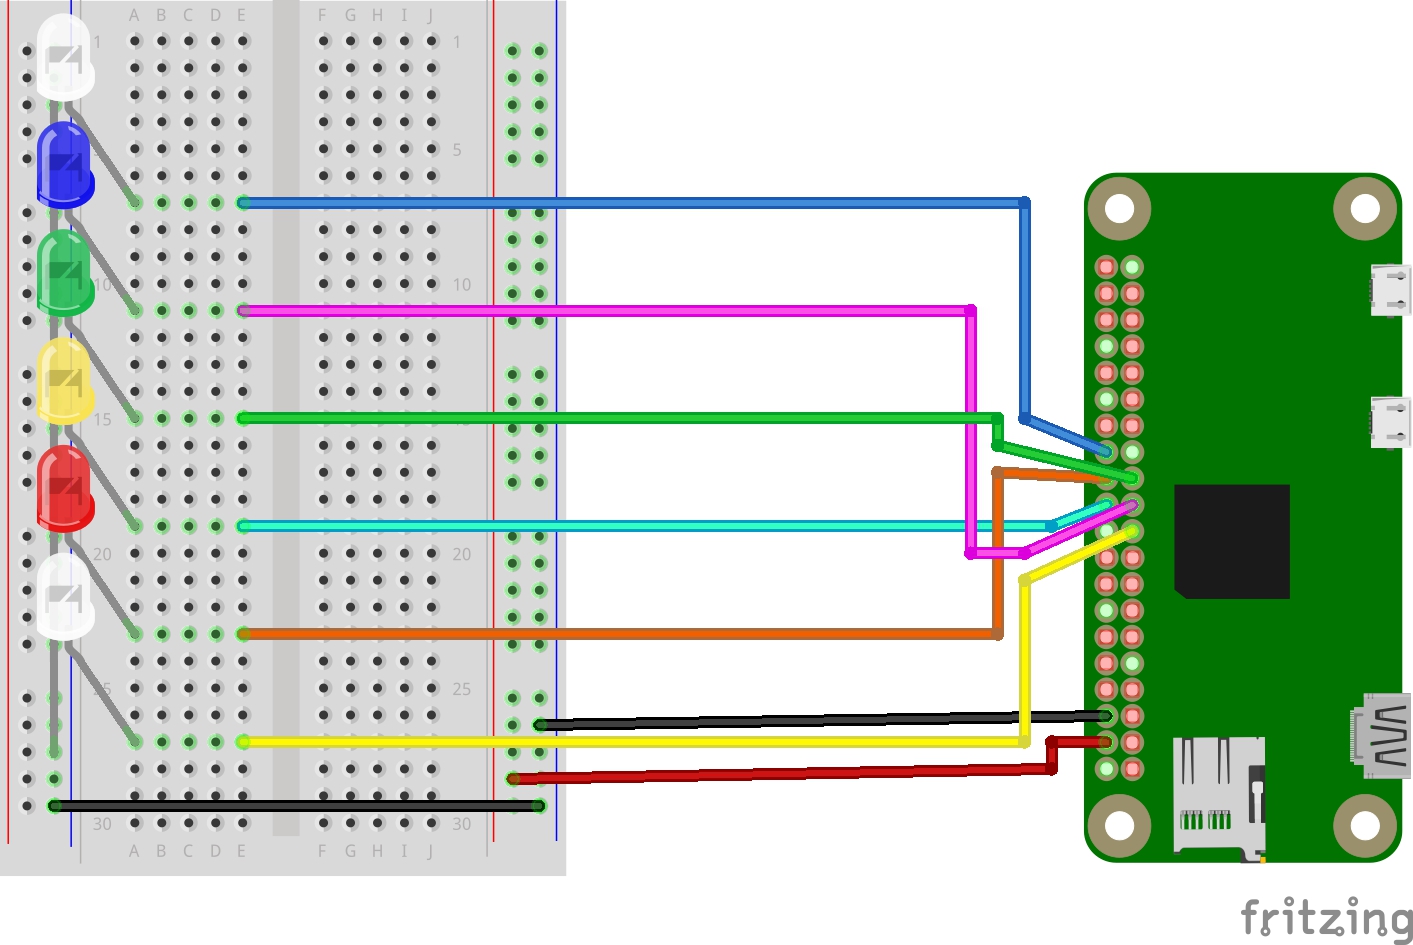
Wiring the LEDs with the Raspberry Pi
Before we continue with the code, lets hook up some LEDs to our Raspberry Pi. I wired them like this (I'm using physical pin numbers to be clear).
White (1): 26
Blue: 21
Green: 23
Yellow: 22
Red: 24
White (2): 19
Linking the LEDs with the PS3 controller
It would be fun if we could make the LEDs represent some of our button states, no..? YES OF COURSE THAT'D BE SO MUCH FUN 🥳! Let's start off by installing some more node dependencies so we can communicate with the GPIO; npm i --save raspi raspi-gpio. Then load the libraries and initialize the board as follows.
const raspi = require('raspi');
const gpio = require('raspi-gpio');

raspi.init(() => {

  ..

});
Now initialize some digital outputs and write each button value to a different led.
..

const ledBlue = new gpio.DigitalOutput('P1-21');

..

  case 0: // cross
    ledBlue.write(button.value);
    break;

..
Your entire file should now look like something like this.
// Libs
const joystick = require('joystick');
const raspi = require('raspi');
const gpio = require('raspi-gpio');

// Init PS3 controller, 0 = /dev/input/js0
const ps3Controller = new joystick(0);

// Init Raspi board
raspi.init(() => {
  // Define digital outputs
  const ledYellow = new gpio.DigitalOutput('P1-22');
  const ledRed = new gpio.DigitalOutput('P1-24');
  const ledBlue = new gpio.DigitalOutput('P1-21');
  const ledGreen = new gpio.DigitalOutput('P1-23');

  // On button press (triggers when pressed and when released)
  ps3Controller.on('button', button => {
    switch (button.number) {
      case 0: // cross
        ledBlue.write(button.value);
        break;
      case 1: // circle
        ledYellow.write(button.value);
        break;
      case 2: // triangle
        ledGreen.write(button.value);
        break;
      case 3: // square
        ledRed.write(button.value);
        break;
    }
  });


  // On axis movement
  ps3Controller.on('axis', axis => {
    switch (axis.number) {
      case 1: // left y-axis
        console.log('left y-axis', axis.value);
        break;
      case 4: // right y-axis
        console.log('right y-axis', axis.value);
        break;
    }
  });
});
And when you run it now using sudo node . you should be able to see the LEDs light up on button press and turn off again on button release 😮!
Why sudo 🤔
We need to use sudo because to be able to interact with the GPIO we need admin privileges. There's ways around this, but out of scope for this guide. For now I hope everything is still working till this point, and if so, great success!


PWM outputs
There are still 2 LEDs left unused and we also haven't used our joysticks yet? Let's change that, to do this we'll make use of PWM (Pulse Width Modulation). There is real PWM and soft PWM, the latter emulates it (software PWM) while the real one is done by the Raspberry Pi. I'm not going to go into detail but we'll use soft PWM as it will be sufficient for this guide and most applications.
Using PWM we can output a signal between 0 and 1 instead of a purely digital signal which is just 1 or 0. So we could map our joystick value to a scale between 0 and 1 and link that to the LED.
First initialize the 2 software PWM outputs as the following.
const pwmOutput1 = new pwm.SoftPWM('P1-19');
const pwmOutput2 = new pwm.SoftPWM('P1-26');
Next up is mapping our joystick signal to a value between 0 and 1, and default to 0.5 (not really, but again, out of scope, this is the easiest to explain it without going into detail). I did that like this.
const max = 32767;

const value = (axis.value * -1) / max / 2 + 0.5;
And finally we just need to write those values to our PWM outputs like this.
pwmOutput1.write(value);
pwmOutput2.write(value);
Normally if you now run the script again you should be able to gradually increase and decrease the brightness of the other 2 LEDs using the joysticks.
Recap
Just for reference, this is the full script you should have now.
// Libs
const joystick = require('joystick');
const raspi = require('raspi');
const gpio = require('raspi-gpio');
const pwm = require('raspi-soft-pwm');

// Init PS3 controller, 0 = /dev/input/js0
const ps3Controller = new joystick(0);

// Init Raspi board
raspi.init(() => {
  // Define digital outputs
  const ledYellow = new gpio.DigitalOutput('P1-22');
  const ledRed = new gpio.DigitalOutput('P1-24');
  const ledBlue = new gpio.DigitalOutput('P1-21');
  const ledGreen = new gpio.DigitalOutput('P1-23');

  // Define our software pwm outputs
  const pwmOutput1 = new pwm.SoftPWM('P1-19');
  const pwmOutput2 = new pwm.SoftPWM('P1-26');

  // On button press (triggers when pressed and when released)
  ps3Controller.on('button', button => {
    switch (button.number) {
      case 0: // cross
        ledBlue.write(button.value);
        break;
      case 1: // circle
        ledYellow.write(button.value);
        break;
      case 2: // triangle
        ledGreen.write(button.value);
        break;
      case 3: // square
        ledRed.write(button.value);
        break;
    }
  });

  // On axis movement
  ps3Controller.on('axis', axis => {
    // Max value in both directions
    const max = 32767;

    // Value between 0 and 1, default: 0.5
    const value = (axis.value * -1) / max / 2 + 0.5;

    switch (axis.number) {
      case 1: // left y-axis
        pwmOutput1.write(value);
        break;
      case 4: // right y-axis
        pwmOutput2.write(value);
        break;
    }
  });
});
End result
If you followed everything as described you should end up with something like below. Hope you learned a few things and already have some ideas for your next project using a PS3 controller, I certainly do 🎮!